

TypoCat Skins
Looking to mix things up and try something new? Typo can be dressed up with the many different skins we have available.
Installing
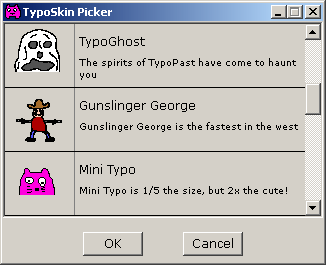
After downloading a new skin simply extract the folder to your "skins" folder in the TypoCat directory. After restarting Typo you can select "Skin..." from the right click context menu and it will open a configuration screen showing all the currently installed skins.

How To Make Skins
Making TypoCat skins is super easy! Every skin configuration consists of 3 basic files:
- A frame of the cat with hands up
- A frame of the cat with hands down
- A TypoSkin.ini file for the configuration
The Images
The frames of the animation are split in half (left/right) when the skin is loaded, and depending which hand is up or down will combine the two halves of the frames to create the correct animation for TypoCat.
All TypoCat skins must be saved as standard Windows bitmaps (*.bmp). The skin loader currently supports loading 16, 256, 16bit, and 24bit color bitmaps. Both uncompressed and RLE compressed bitmaps are supported.
Transparency on the bitmaps is always defined as pure magenta (#FF00FF). Any pixels of that color will not appear on the screen.
The easiest way to make a TypoCat skin is to first draw your character in the center of the canvas without the hands on the screen. Save this image to use as the base for both frames of the skin as to keep it consistent.
TypoSkins.ini
The TypoSkins.ini file is the main configuration for your skin and how TypoCat detects your skin when searching the directory for new content.
Every TypoSkin.ini file starts with a [skin] section holding all the info needed to load a skin.
The name= line contains the name of your skin and the info= line contains a brief description of what your skin is.
frame1= points to the file containing the "neutral" frame of your skin with the hands up. frame2= points to the file holding the frame with both hands down.
Finally, you can include an optional icon= line for your configuration to show an alternate icon in the skin picker. Icons are typically 64x64.
Downloads
Here are some free TypoCat skins available for download!
If you have a cool skin you've made and want to share it, send me an email at
grahamdowney1@gmail.com with a copy of your skin and you might get it
featured here on this site!
TypoDog By Graham Downey Download (5,540 bytes) |
TypoGhost By Graham Downey Download (3,857 bytes) |
TypoPanda By Dylan Downey Download (11,575 bytes) |
Ashpe TypingCat By Ashpe Games Download (15,315 bytes) |
Gunslinger By Graham Downey Download (5,491 bytes) |
Shy Elephant By Graham Downey Download (3,655 bytes) |
Example Skin By Graham Downey Download (4,823 bytes) |